Recently I needed to create a custom WinForms label-like control that allowed for the text to be displayed in a rotated fashion. Our needs were only for four rotation locations; 0 degrees (the default label position), 90, 180 and 270 degrees. There were other complicating factors, but for this post we’ll only concentrate on this component of the control.
To rotate text using the Graphics.DrawString method you only have to do a couple of things. First you have to use the Graphics.TranslateTransform method, then the Graphics.RotateTransform method, and followed by the Graphics.DrawString. Here’s what it looks like.
1 | using (var brush = new SolidBrush(ForeColor)) |
What you see are the three steps that I outlined above. Let’s start at the bottom and work our way up. The code exists inside of a UserControl’s overridden OnPaint event. The DrawString method makes use of some of the properties on the control, like Text and Font. It also uses the DisplayRectangle property to set the boundaries for the drawing to be the same size as the control. This is one of the keys to making the rotations work. The other key is to provide the DrawString with the StringFormat settings. By setting them to be StringAlignment.Near for both the Alignment and LineAlignment, you are declaring that the text’s location should be based in the top left of the DisplayRectangle’s area.
Graphics.RotateTransform is how you set the rotation value. In the case of our control, we would be putting in a value from the list of 0, 90, 180, and 270. As you might expect the rotations are clockwise with 0 starting with the text in the ‘normal’ location.
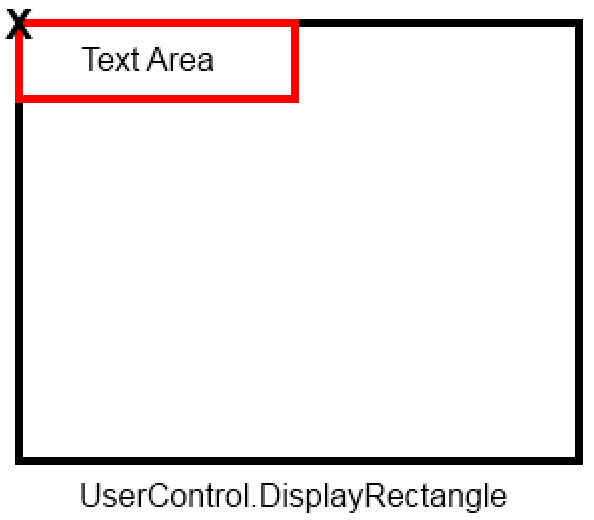
Graphics.TranslateTransform is where the last piece of magic occurs. It is here that you set where the top right corner of the text drawing area will be located in the DisplayRectangle’s area. Here are some images that will help clarify the situation.
When you need the text to appear the same as “Text Area” does in the above image (rotated 0 degrees), you need to set the TranslateTransform X and Y parameters to be those that are designated by the “X” in the image. In this case, it’s X=0 and Y = 0.
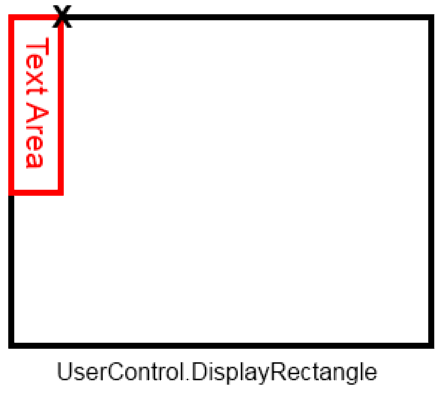
The picture above shows you what you should be displayed when you are rotating the text “Text Area” 90 degrees. Again, you need to set the TranslateTransform, but this time the values are slightly different. The Y parameter is still 0, but the X parameter equals the height of the text. You can get this value by using the following line of code:
1 | var textSize = TextRenderer.MeasureText(Text, Font); |
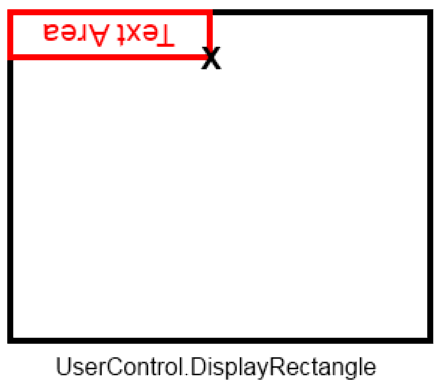
To render the text upside down we set the rotation to 180 degrees and then, again, determine the location of the TranslateTransform X and Y coordinates. Like we did for the last rotation, we will need to retrieve the text size to set these values. For this situation Y will be the text height and X will be the text width.
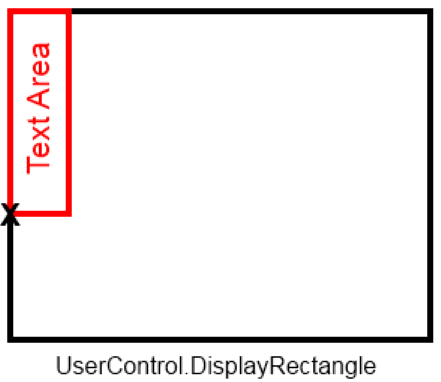
The final step is to make the rotation work for 270 degrees. Like all the others, we need to set the X and Y coordinates for the TranslateTransform method call. Here the Y value will be the text width and the X value will be 0.
This is simply the first step of many to making a control that will allow rotation of the text and locating it in one of 9 locations in a 3x3 grid representation of the control’s DisplayRectangle. More on that in another blog post though.


